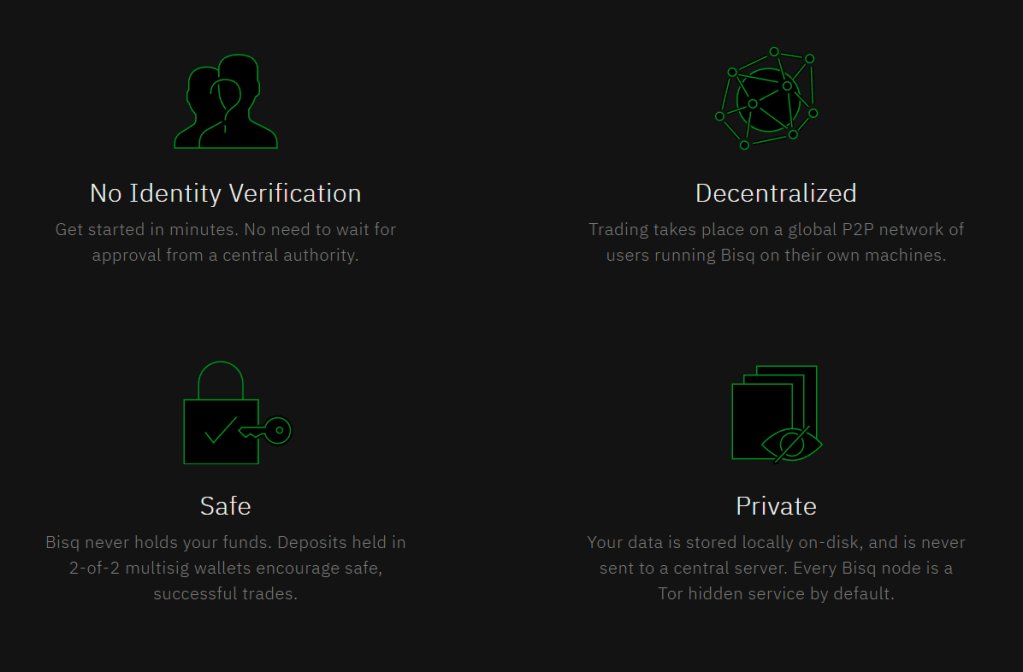
Today more and more individuals are becoming concerned about their financial privacy. Financial censorship is on the rise around the world as the financial system becomes increasingly weaponized. Bitcoin is a censorship resistant tool which can be used in an anonymous way as long as a user’s privacy can be ensured.
Bisq is a decentralised platform which has allowed users from anywhere in the world to trade bitcoin for fiat currencies since 2014. However some people are concerned with its safety or that it may be too complicated to use.
In this post we will provide a high level guide on what Bisq is and show you how we used the platform to buy a million satoshis from another user.
What is Bisq?
Bisq is a peer-to-peer exchange where users can buy and sell bitcoin directly from other users with no registration needed. The infrastructure of Bisq is decentralized which means there are no central servers to shut down or to steal user data from. The software is open-source, comes with a built-in bitcoin wallet and lets you connect to your own node for a fully sovereign experience.
The platform doesn’t hold users’ funds but instead relies on a system of escrow with a security deposit to ensure honest behaviour. The seller deposits the bitcoin in a 2 of 2 multisig escrow address, where both participants also send a security deposit. The funds are released to the buyer once the seller confirms that they have received the payment. Both parties have to agree to release the funds and in the case of a dispute, a mediator will attempt to find an agreement. If no amiable solution can be reached, the bitcoin will be sent to an arbitrator once the timelock of the transaction expires.
Supported payment methods include bank transfers, online payment systems such as Strike, Revolut or Paypal, and money transfer services, for instance Western Union or Moneygram.
For more information about how Bisq works and how to use it safely, you can check out their documentation and wiki pages.
Downloading and installing the software
Bisq is a desktop application available for the majority of Linux distributions, Windows and macOS. You can find the version you need on the Bisq Downloads page, along with the PGP signature for verification.
To prevent future issues with their certificates, code signing has been removed from Windows and macOS releases, which means you might get a security warning when executing the app’s installer and Mac users may have to allow the app to be installed from their settings. Visit Bisq’s wiki if you are experiencing issues with the installation.
Setting up your account
Setting up your account should only take a few minutes, after which you’ll be ready to buy some bitcoin. You will find all these options in the Account tab of the top left menu.

- Add your fiat account details. This is the account you will use to send and receive money when you buy or sell bitcoin. Pick the method you wish to use and fill out the details needed.
- Create your wallet password. This password will be used to encrypt your wallet files, otherwise they will be stored in plain text on your computer. There is no password recovery process so make sure you remember it or write it down (on paper) for extra safety.
- Backup your seed words. Bisq comes with a built-in Bitcoin wallet which is able to send and receive transactions, and is backed up by a 12 words passphrase. Write those 12 words on paper, do not save them in a text file or an email, and do not take pictures of it. Also note that you should avoid importing this private key to another wallet software as it might interfere with your Bisq trades and your balance.
- Backup the data from the Bisq app. This is for recovering your account information in case of an issue such as hardware failure. Select the location and click Backup now.
Picking an offer
We are now ready to buy some bitcoin. Click on Buy in the navigation bar on the top of the screen- this will redirect you to a page where you can see all of the offers posted by sellers which are ready to be accepted. Turn on the Offers matching my accounts switch, this will ensure that you only see offers that are relevant to you.
Until you complete your first trade with a verified user the amount you can trade with your newly created account will be limited and will depend on the payment method selected.
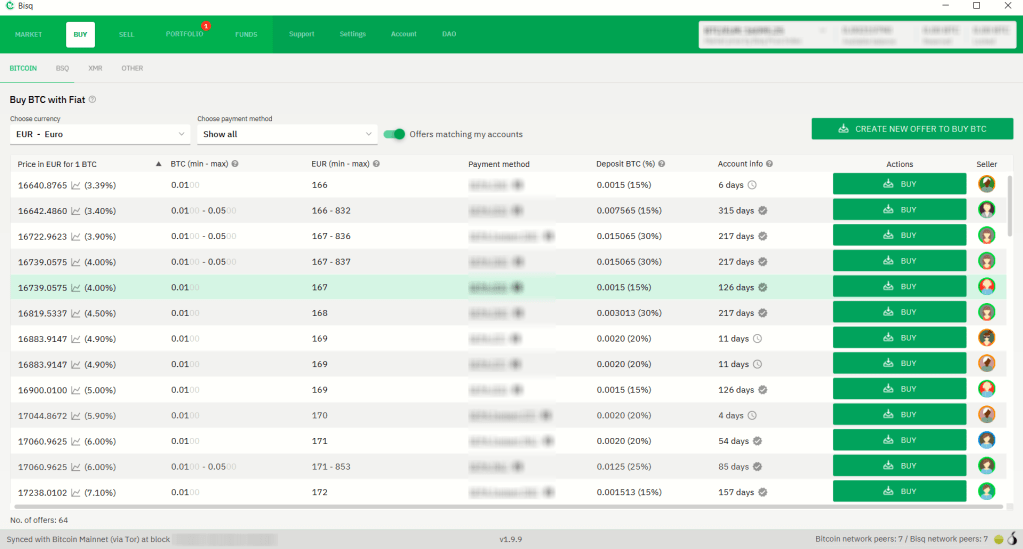
Offers are sorted by price, and the percentage value next to it is the spread, which is the difference between the offer price and the spot price.
The next two columns show the amount of BTC for this offer and the price in your selected currency. The size of the offer can be a range, in which case you can select any amount to buy within this range.
Another important column is the Deposit BTC column, which tells you how much bitcoin you will need to place as a security deposit if you wish to enter that trade. For offers with a range the deposit amount is fixed and does not scale, which means you might end up having to place a large percentage of the amount as a deposit.
You can also see some information about the seller such as the age of their account and if they have already successfully signed their account by completing a trade.
Entering a trade and funding your account
Once you’ve decided how many satoshis you’d like to buy, clicking the Buy button will take you to the next screen where you can review the offer.
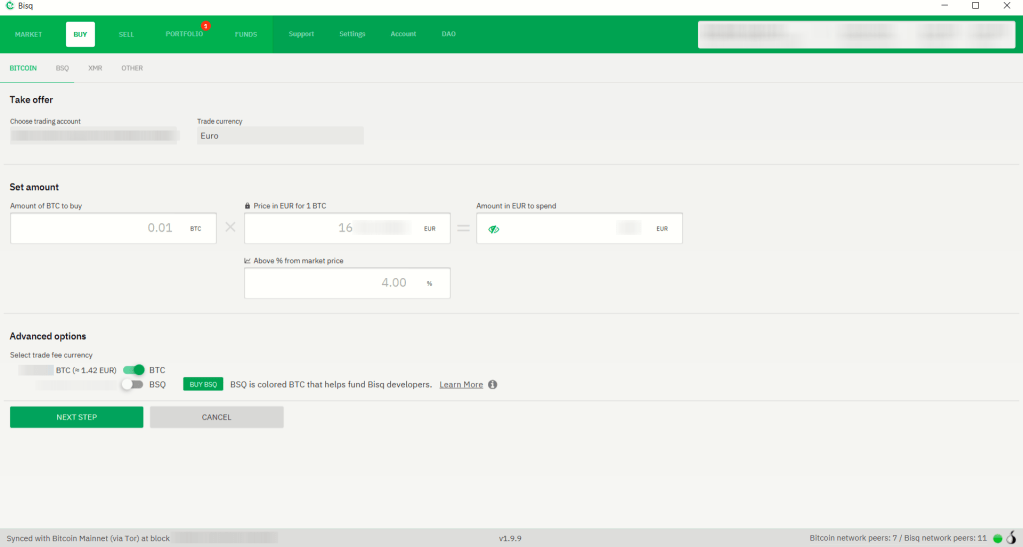
As you can see we found an offer within 4% of the Bisq price index, with the fee representing less than 1% of the value of the transaction. Make sure that everything is in order and click Next Step to proceed.

Once we’ve taken the trade we’ll need to deposit some bitcoin which will serve as the security deposit as well as payment for the trade fee and mining fee. Our Bisq wallet is still empty so we’ll need to fund it with an on-chain transaction. You can copy the address and the BTC amount, scan the QR code with your wallet software, or click Open your external wallet for funding which should automatically detect and open your desktop wallet app. Make sure you attach a sufficient fee to the transaction.
Make sure not to use bitcoin that could be linked back to your identity (coins bought using a KYC exchange for example) when funding your Bisq wallet as it would become a risk for your privacy. Create separate wallets (or separate passphrases) to segregate any KYC bitcoin.
As soon as your transaction has been confirmed into a new block you will be able to proceed. Click Take offer to buy bitcoin to see a screen where you can review all the information about the trade.
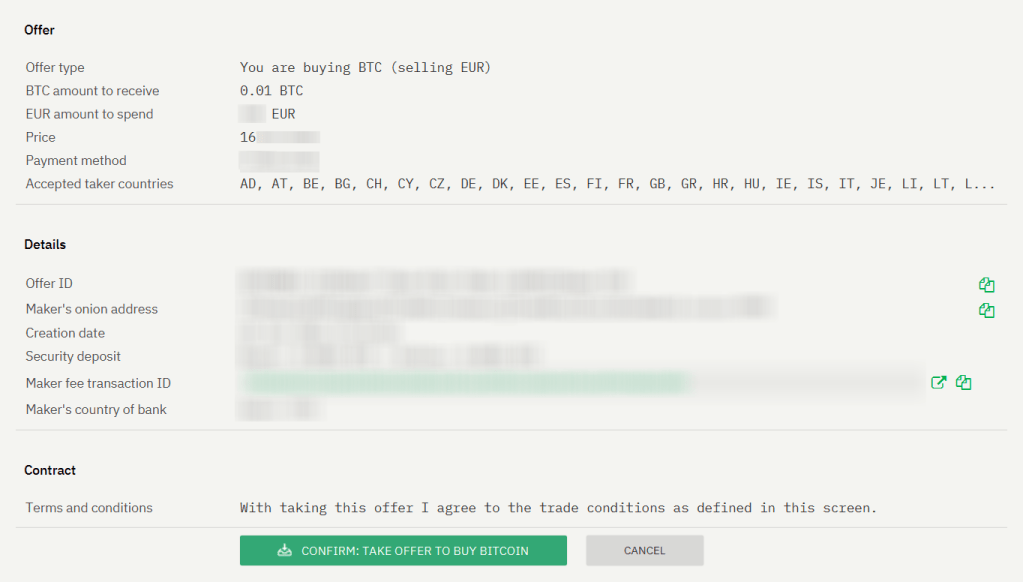
Once you click Confirm the trade will begin and you must follow it through to the end or you might lose your deposit, so make sure to double-check the details.
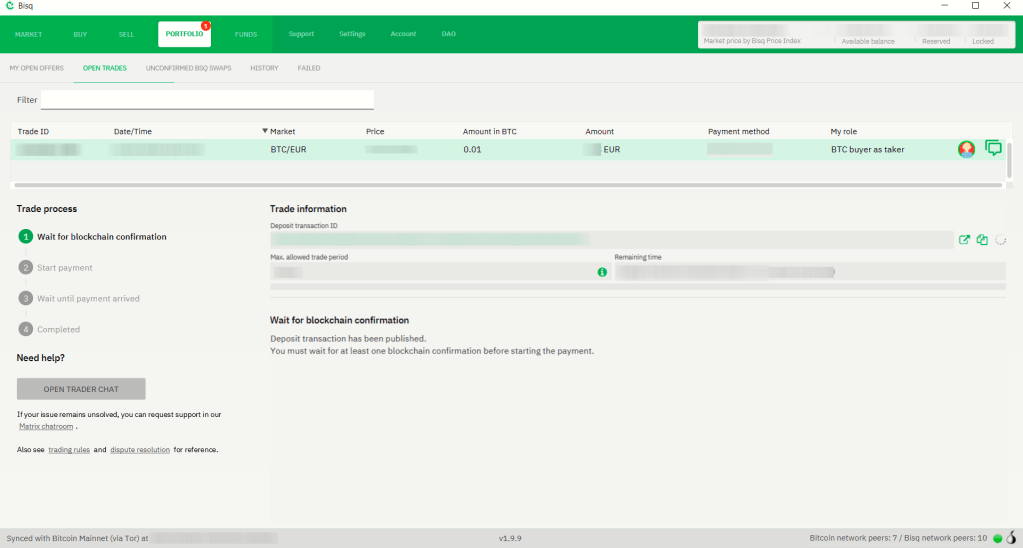
Making the trade
Once you have entered the trade you will need to wait for the escrow transaction to be confirmed which will take 10 minutes on average. After that, you can pay the seller using the agreed upon-method and click Payment started to let them know the money is on its way. They will release the bitcoin as soon as they receive the payment and it will be sent to your wallet along with your security deposit.
An encrypted chat allow users to message each other during the trade in case of a problem.

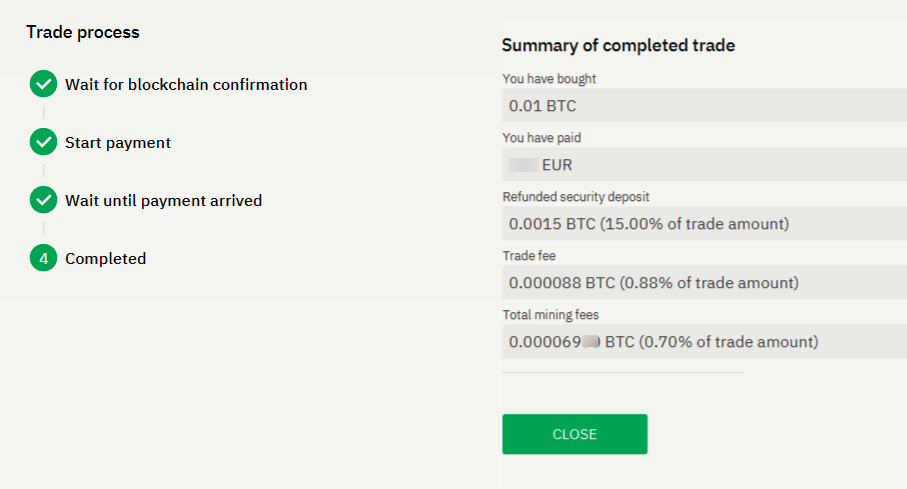
Don’t forget to move your bitcoin into cold storage once you’re done. Bisq’s embedded wallet is a hot wallet which means you could leave some sats on there to fund future transactions but it isn’t meant to securely store large amounts of bitcoin.
Some technical issues with the DAO
We experienced some difficulties entering our first trade after installing Bisq. These were related to the Bisq DAO state not being synchronized.
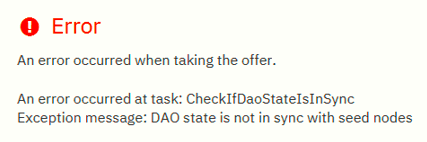
It seems that a number of users have been experiencing this issue so we thought it was worth mentioning in this article. Here’s how you can try to fix it:
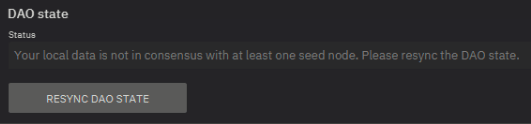
- Get to the DAO tab of the top left menu and navigate to Network monitor. Check if you can click Resync DAO state, then wait a few minutes.
- Simply restarting the software and waiting for the DAO state to synchronize seems to have worked for some users (it could take up to a few hours so be patient).
A quick note on the BSQ token
In 2017 a plan was published to change the Bisq network’s system of governance to a DAO and introduce the BSQ token. It is possible to use the platform without it and just like any altcoin we do not recommend that users invest in the BSQ token.
Summary
We went through the process of installing Bisq, creating our account, making a trade and withdrawing the bitcoin to cold storage in just a few hours in spite of a few initial hurdles. Here’s what we learnt from our experience using Bisq:
- Bisq can seem complex at first but should become pretty straightforward after you have completed your first trade.
- You need to already have some bitcoin to be able use the platform, which could be a obstacle to users trying to buy it for the first time.
- The escrow model seems to be keeping users honest and we didn’t have any safety concerns using the platform.
- Taken into account the spread and fees you should be able to buy BTC within 5 to 10% of the spot price. Trading fees are used to pay contributors to the project.
- Bisq’s decentralized nature makes it very resistant to hacks or regulatory attacks.
- Having Bisq installed and knowing how to use it gives you redundancy in case you become unable to use your usual bitcoin exchange.
Bisq can be used by anyone from anywhere in the world and is one of the most resilient and private platforms out there. Whilst we wouldn’t recommend it to new users of Bitcoin, if you are interested in learning how to use the tool we’d certainly encourage you to give it a go.
If you found this guide useful please consider subscribing to the blog, and following us on Twitter @bitcoinbumbleB
Posted at block 771938


Leave a comment